

Saturday’s trip to Paisley was always going to be a tricky game for Heart of Midlothian. The venue itself promised as much – St Mirren have one of the best home records in the Premiership, after all – but so did the circumstances surrounding the game itself.
With the Buddies fighting for a place in the top six, the home side simply had more riding on the match’s outcome. The heavy winds ensured that neither side would be able to get their foot on the ball and really dominate proceedings, while the absences of Calem Nieuwenhof, Beni Baningime and Lawrence Shankland meant Hearts were missing three of their most important players.
It all pointed to a difficult afternoon at the SMiSA Stadium but that isn’t what transpired in the end. Sure, the 2-1 win required a battling performance and the final result was by no means a given – but Hearts were worthy winners in the end.
READ MORE: Hearts break 32-year record at St Mirren as one player stands out in 2-1 win
A different approach
A lot of Hearts games have taken on a familiar pattern this season. Naismith’s men tend to enjoy around 60 per cent of the possession and often have lengthy sustained passing moves where they try to break their opponents down. There’s usually a fair bit of control without too much incision – but that wasn’t the case on Saturday.
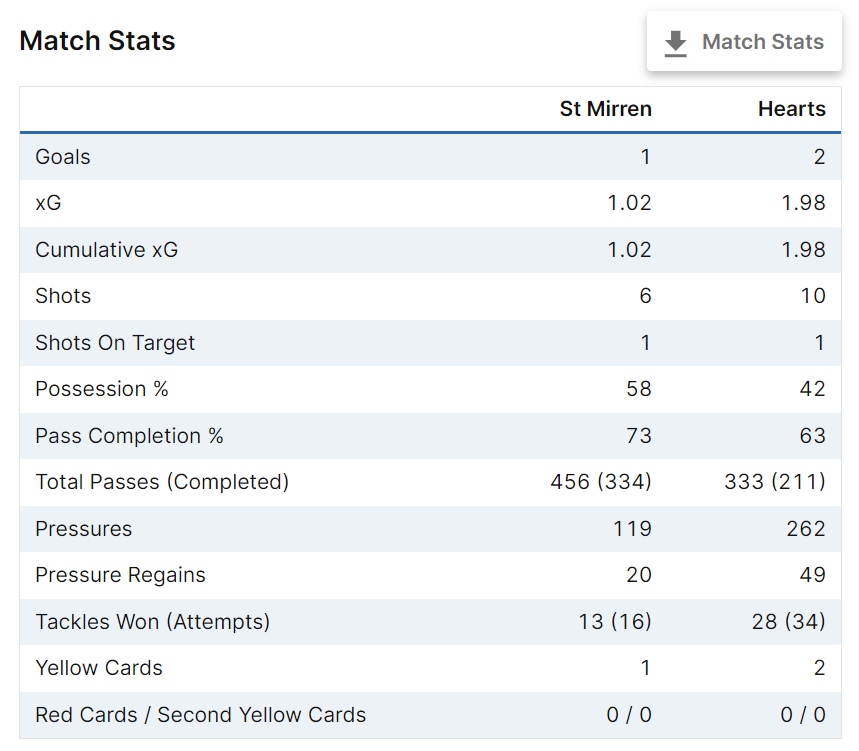
Whatever the reason – whether it was difficult conditions or the key personnel missing – this was a very different Hearts performance. The men in maroon only saw 42 per cent of the ball on Saturday, while the team’s overall passing accuracy of 63 per cent gives an indication of the lack of control on the ball. Off of it, though, Hearts were industrious indeed, attempting twice as many pressures as St Mirren.
The xG would suggest that the final scoreline was a fair reflection of the game, but there is one stat that probably sums up the game more aptly. Between them, Hearts and St Mirren mustered just two shots on target across the 90 minutes. The only save of note being Zander Clark's to stop Frankie Kent's goal-bound effort after an interception. Chances were rare, and the ball spent most of the game bobbling around in extremely congested areas.
This was more of a battle to be fought than a game to be won, and nobody understood this better than Cammy Devlin. By the time the full-time whistle rang out, the tenacious Aussie had completed a combined 10 tackles and interceptions. No St Mirren player had any more than four. The graphic below includes every player from Saturday who completed at least two tackles and/or interceptions.
A quick word for Alex Cochrane too, who completed eight tackles during the game: a remarkable tally. It would also be remiss not to point out Rowles' excellent performance here, particularly after the torrid time he had on his last visit to Paisley.
READ MORE: Steven Naismith Q&A - Best aspect of St Mirren win and why Kingsley was subbed off
A worthy win
This was a different sort of Hearts performance to what we’ve become accustomed to this season and it made the final result all the sweeter. Naismith’s side couldn’t really play the game how they would have liked, but they managed to grind out the win nonetheless away to a tricky opponent. There aren’t many more satisfying ways to pick up three points.
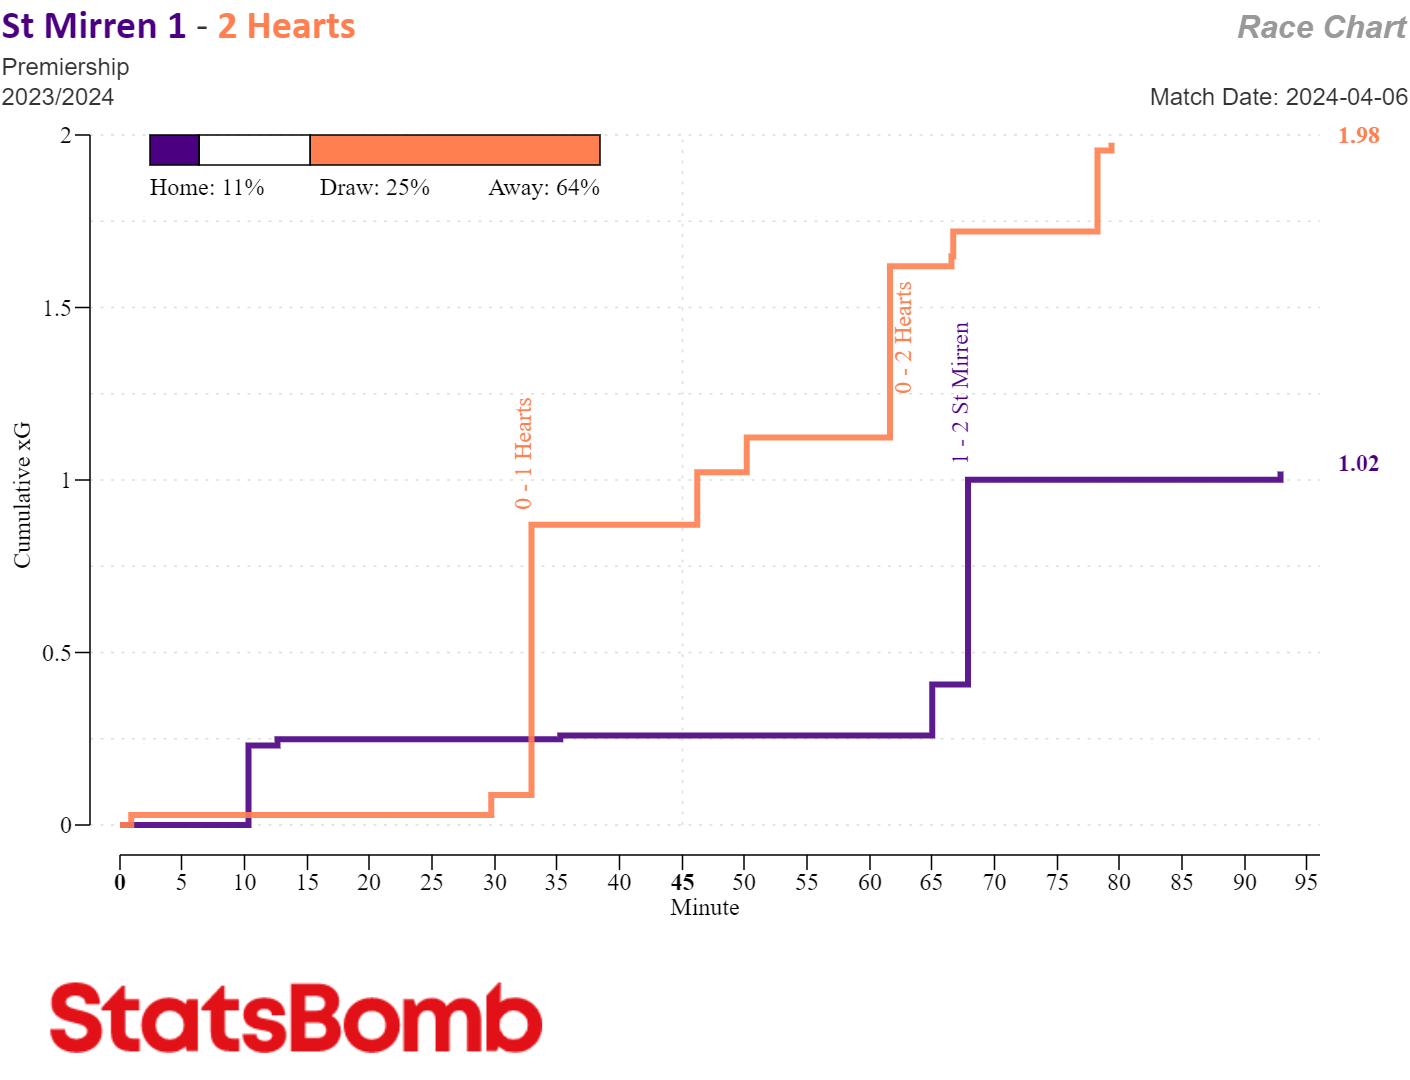
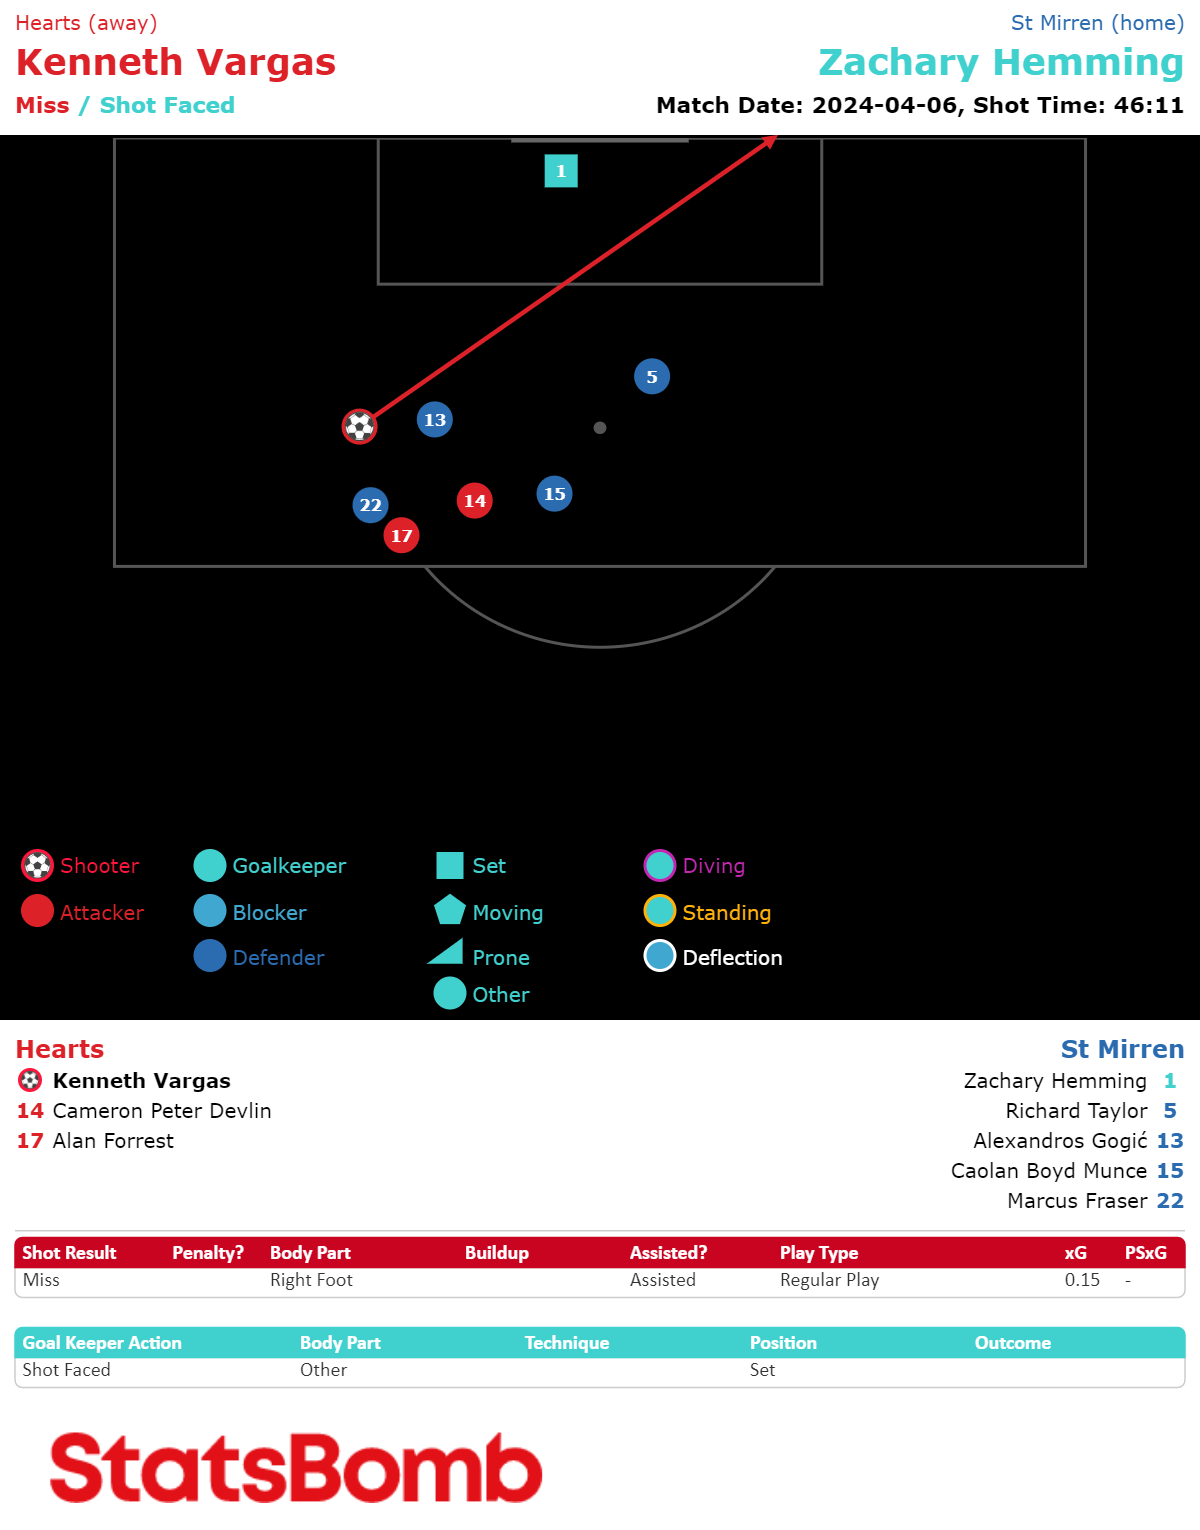
The game’s race chart is telling. Going by the xG, a 2-1 win for the visitors was a fair result. But the shape tells its own story. Hearts didn’t fashion anything of note until Kenneth Vargas’ effort on goal that led to the penalty and the opener. There weren’t any more opportunities in the first half but in the second they arrived fairly regularly.
St Mirren, meanwhile, struggled to create anything whatsoever throughout the match. Barring an early Scott Tanser header from a corner and a Richard Taylor header from another corner in the second half, Zander Clark’s goal hadn’t been truly threatened until it was breached by Toyosi Olusanya on 68 minutes. After bustling his way through the centre, the St Mirren striker had the whole goal to aim for and his shot had an xG of 0.59 – as good as chance as you’ll get from open play in the Scottish Premiership.
Afterward, though, the Buddies never truly threatened a comeback. Hearts saw the game out in a professional manner – and neither side could have any complaints about the final result.
READ MORE: Stephen Robinson praises Hearts board for sticking by Steven Naismith
Fine margins
Hearts were worthy winners on Saturday, but it would be churlish to suggest that it was a comfortable victory. Nearly half of the team’s shots on goal were blocked and the away side struggled to create clear-cut openings.
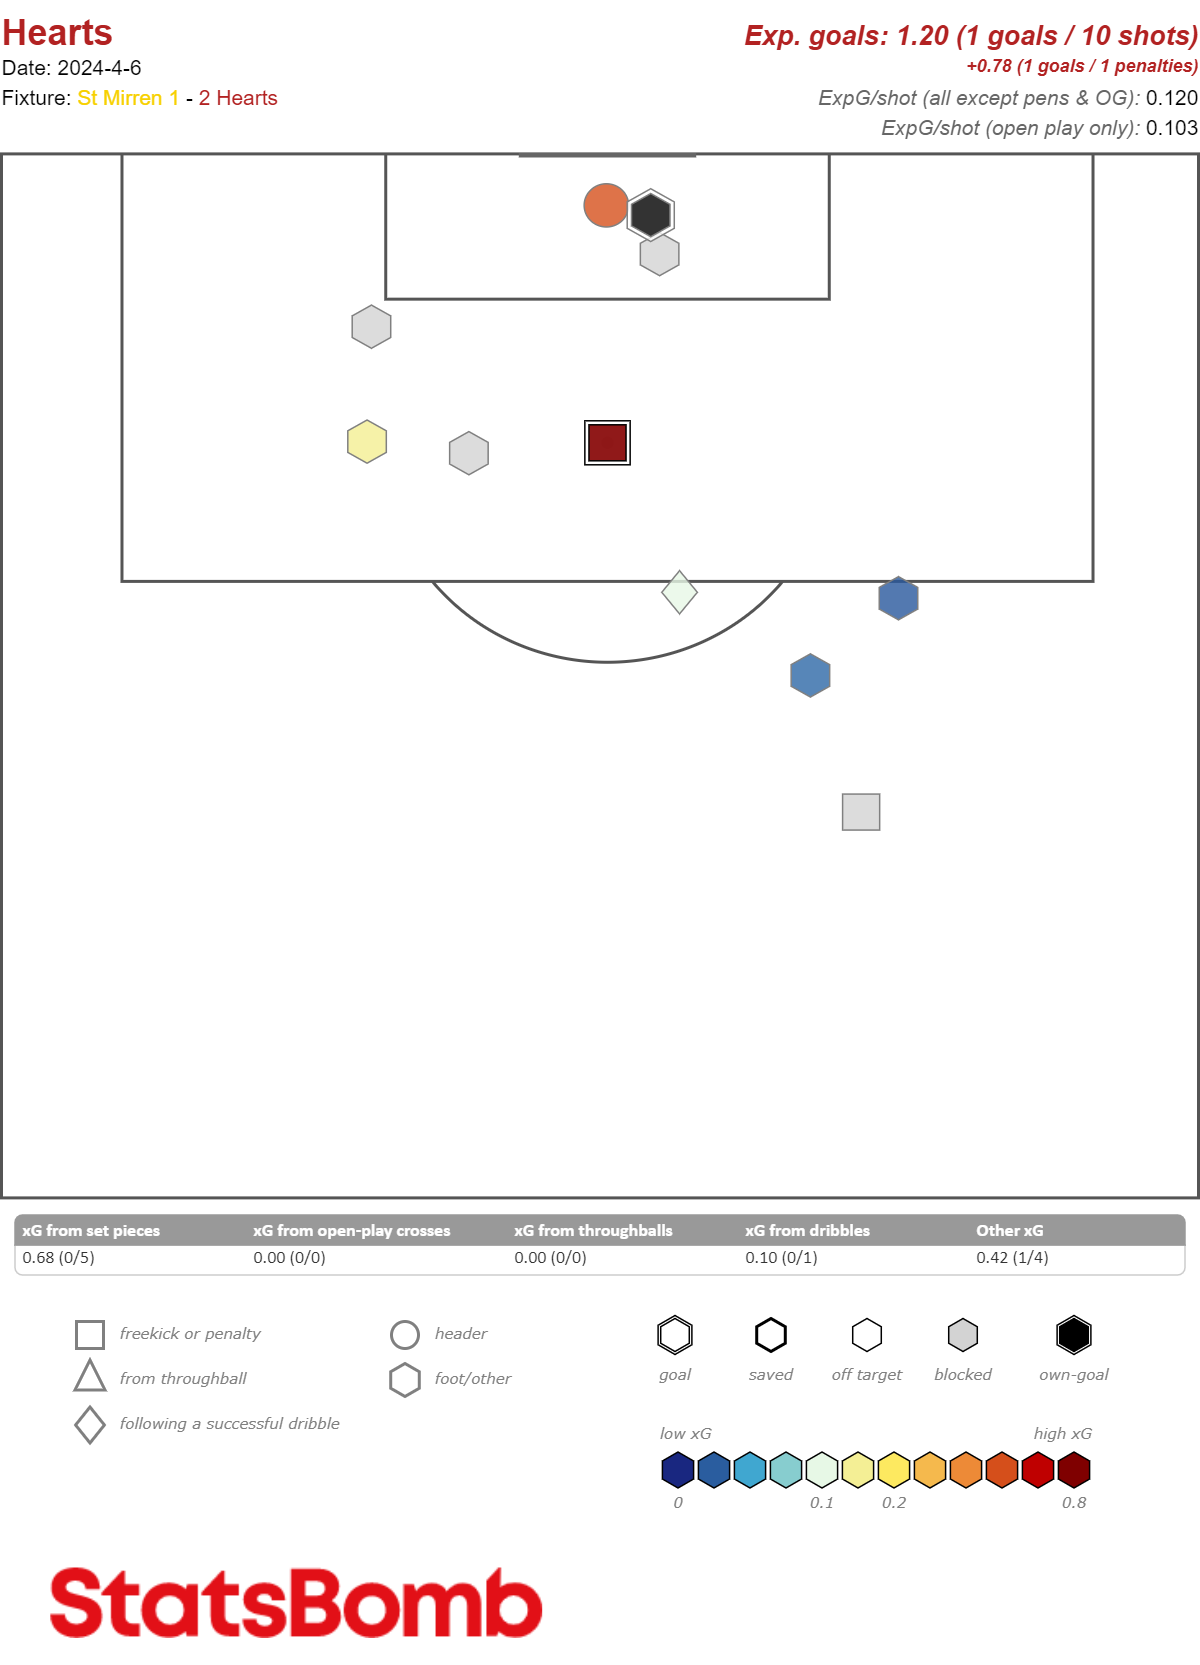
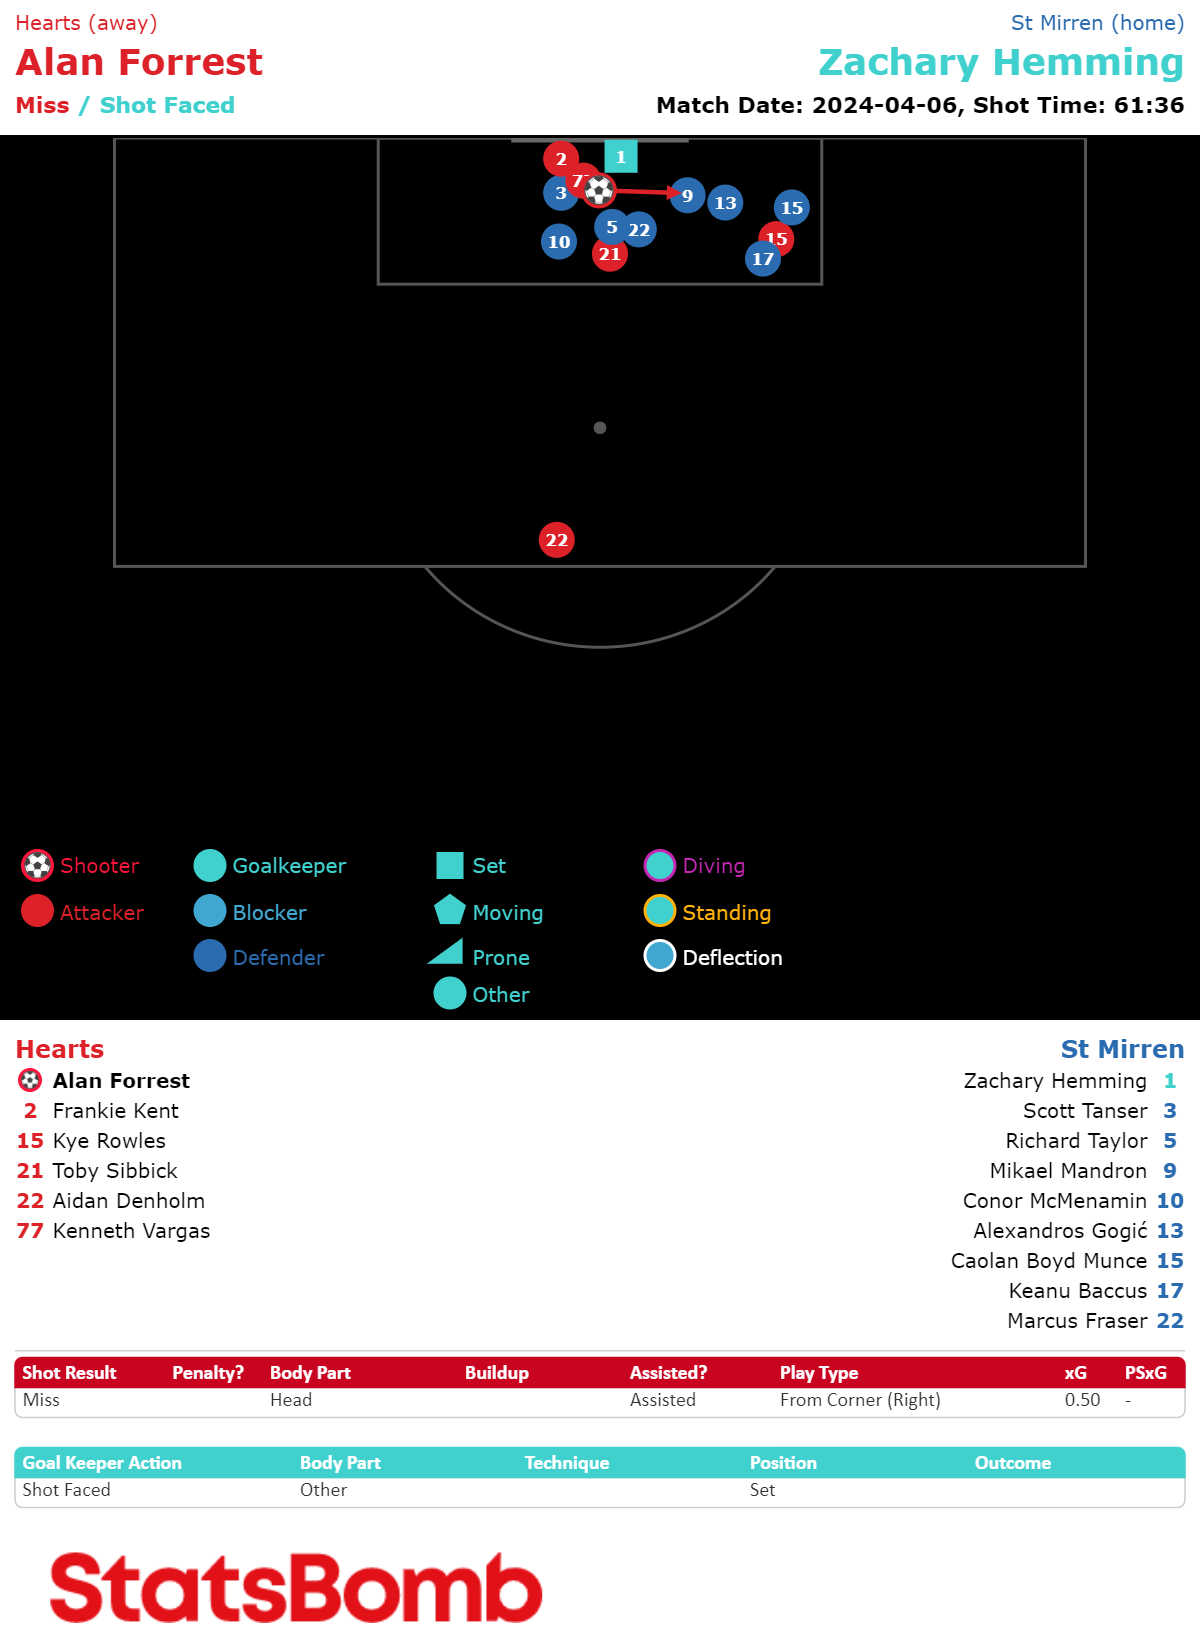
Take a look at the shot map above. The amber dot on the goalline is Alan Forrest’s header for the second goal and the black dot to the right represents Mikael Mandron’s own goal. Grey shapes indicate a blocked shot, and a blue-yellow-red colour scale is used to show the xG of a shot.
Notice how Hearts had just one shot from open play inside the box that wasn’t blocked across the full 90 minutes: Vargas’ dragged shot wide of the far post shortly after the restart.
And then there’s the second goal. The delivery into the box from Alex Cochrane was superb and when Forrest connected with the ball, his header had an xG of 0.5. That figure quickly plummeted to zero when the ball moved away from goal, but it ended up in the back of the net nonetheless after ricocheting off Mandron.
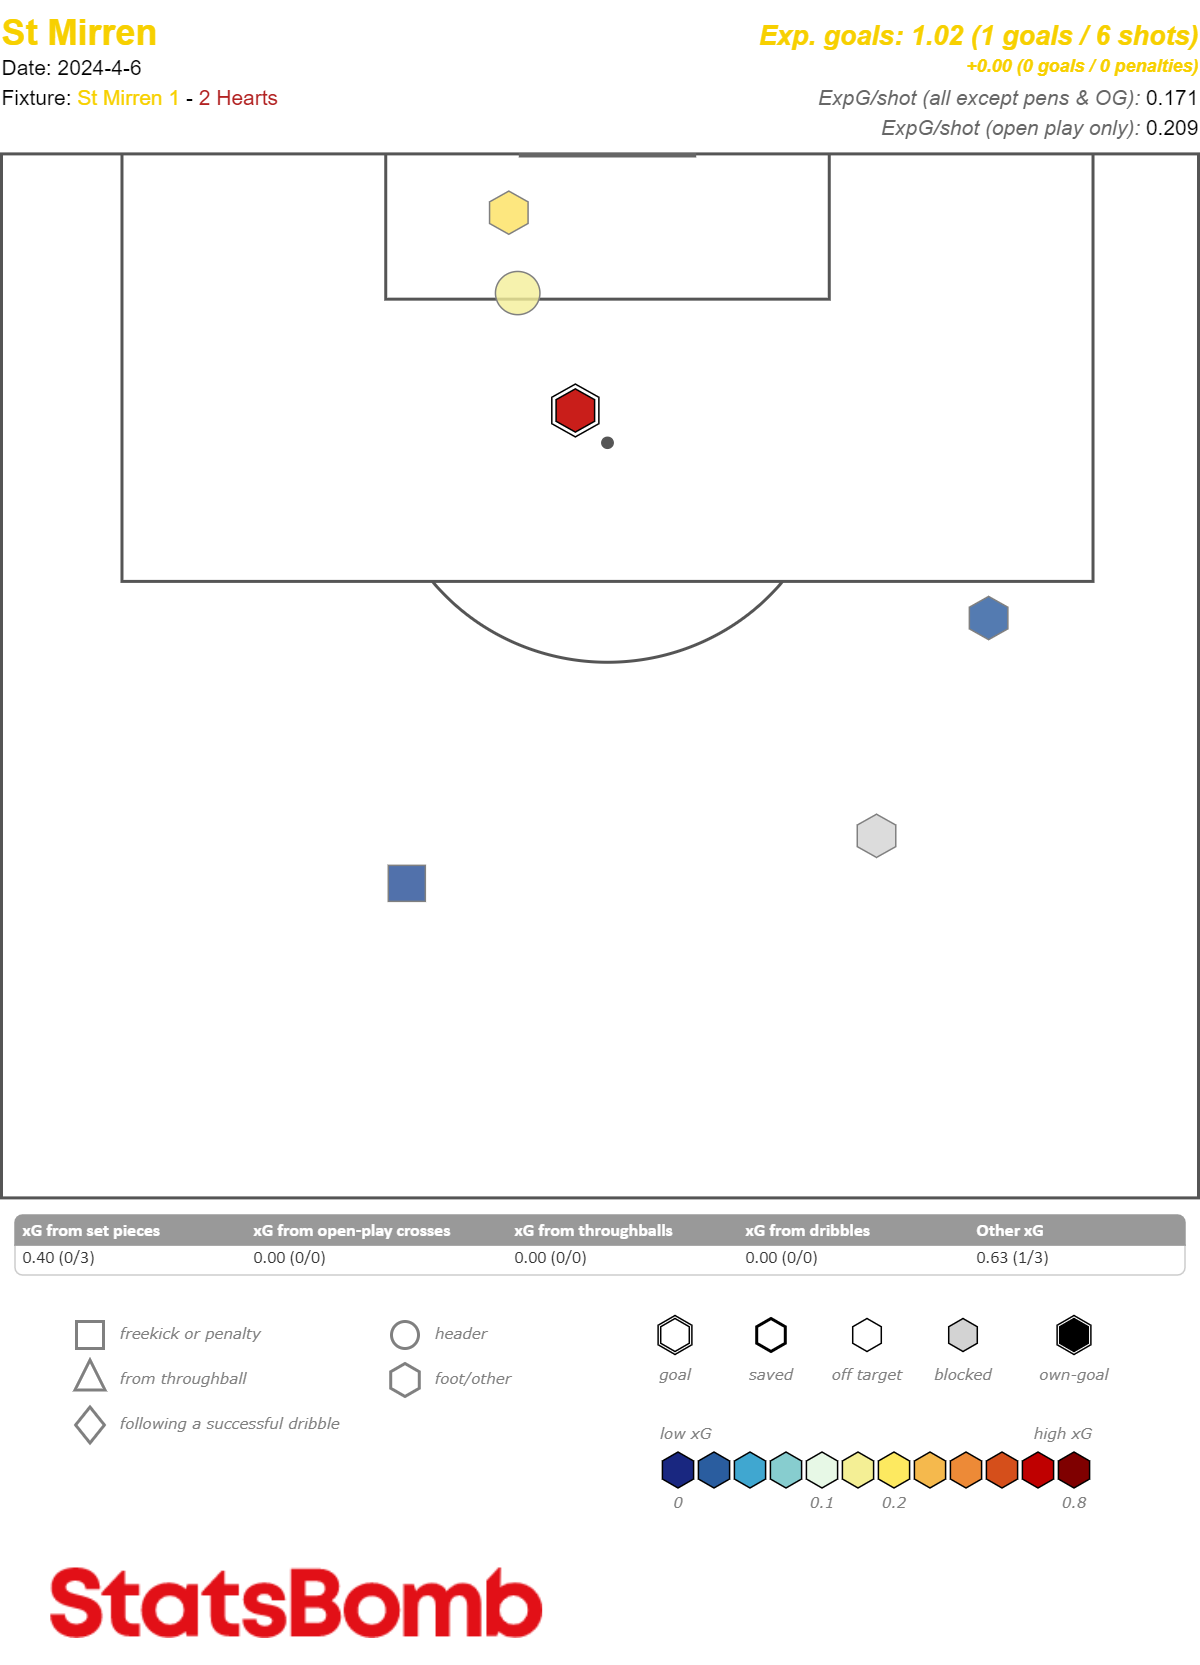
At the other end, though, the back three was highly effective at keeping St Mirren quiet. Take a look at their shot map below. The two yellow dots are Tanser and Taylor’s headers from corners and the maroon hexagon represents Olusanya’s goal. Other than that, Stephen Robinson’s men didn’t muster a single shot from inside the box.
READ MORE: Lawrence Shankland's Hearts absence explained: Striker misses St Mirren clash
Congested out wide
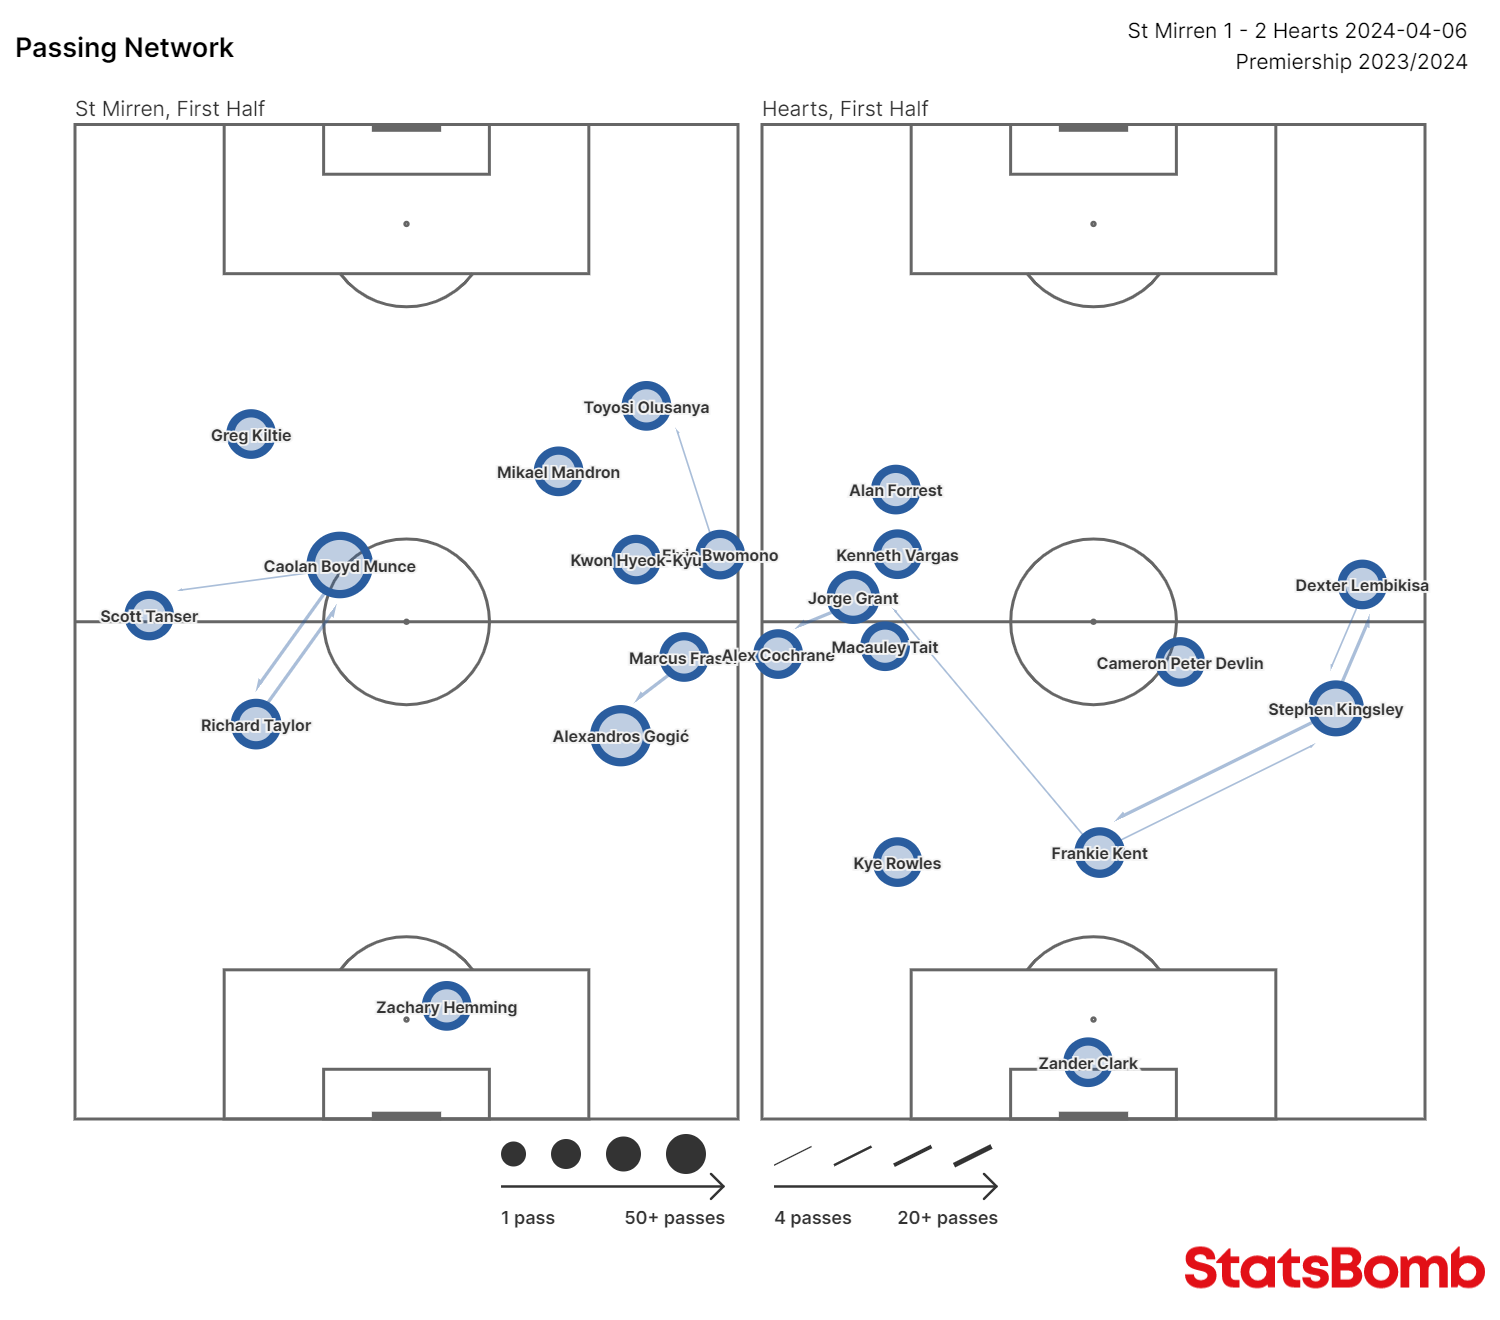
Much of Saturday’s contest was played in the wide areas, where play was extremely congested and space was at a premium. Take a look at the two teams’ passing networks for the first half below, which demonstrates the point nicely. Most of the game was contested down Hearts’ left.
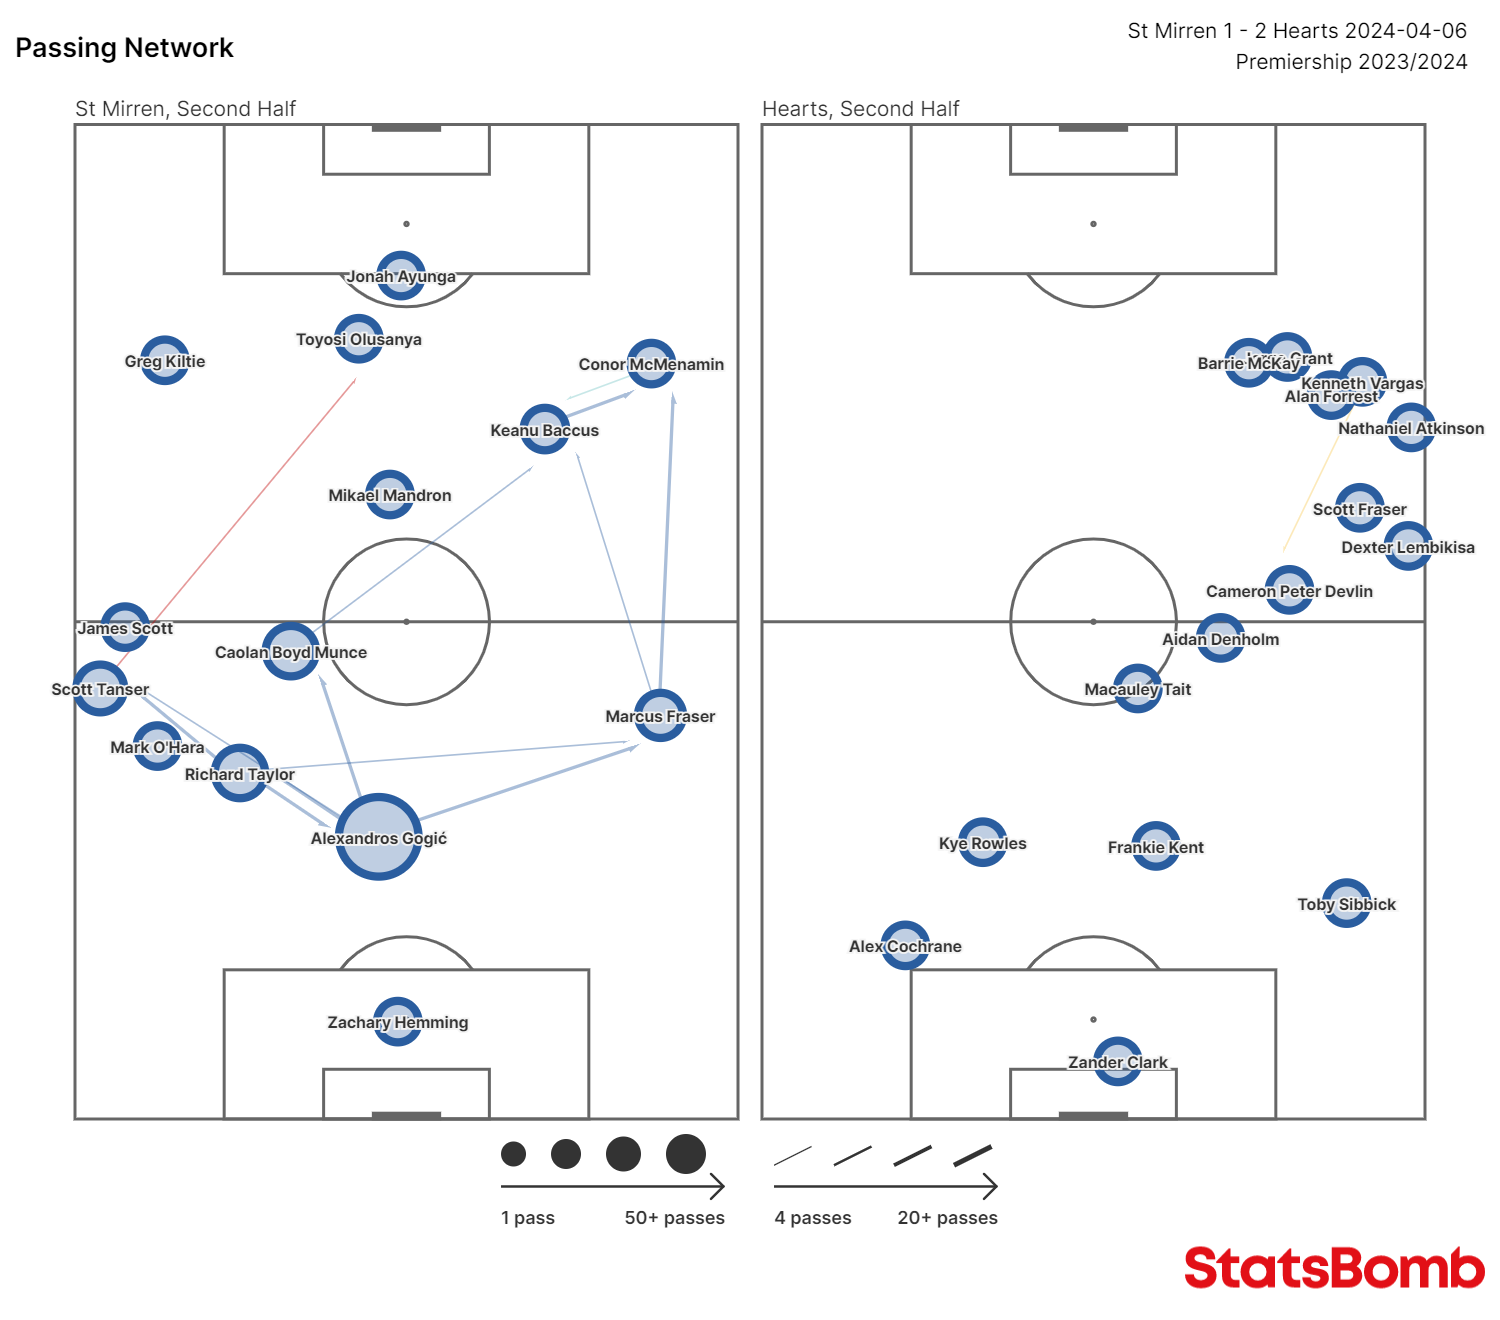
Hearts would switch flanks in the second half but the pattern remained largely the same. The introduction of substitutes makes the second-half graphic a little harder to follow, but pay attention to the overall shape: everything Hearts tried went down the right, and the team was again lopsided.
The two sides’ pressing maps tell a similar story. Notice how almost all of the pressure is applied down the wings.
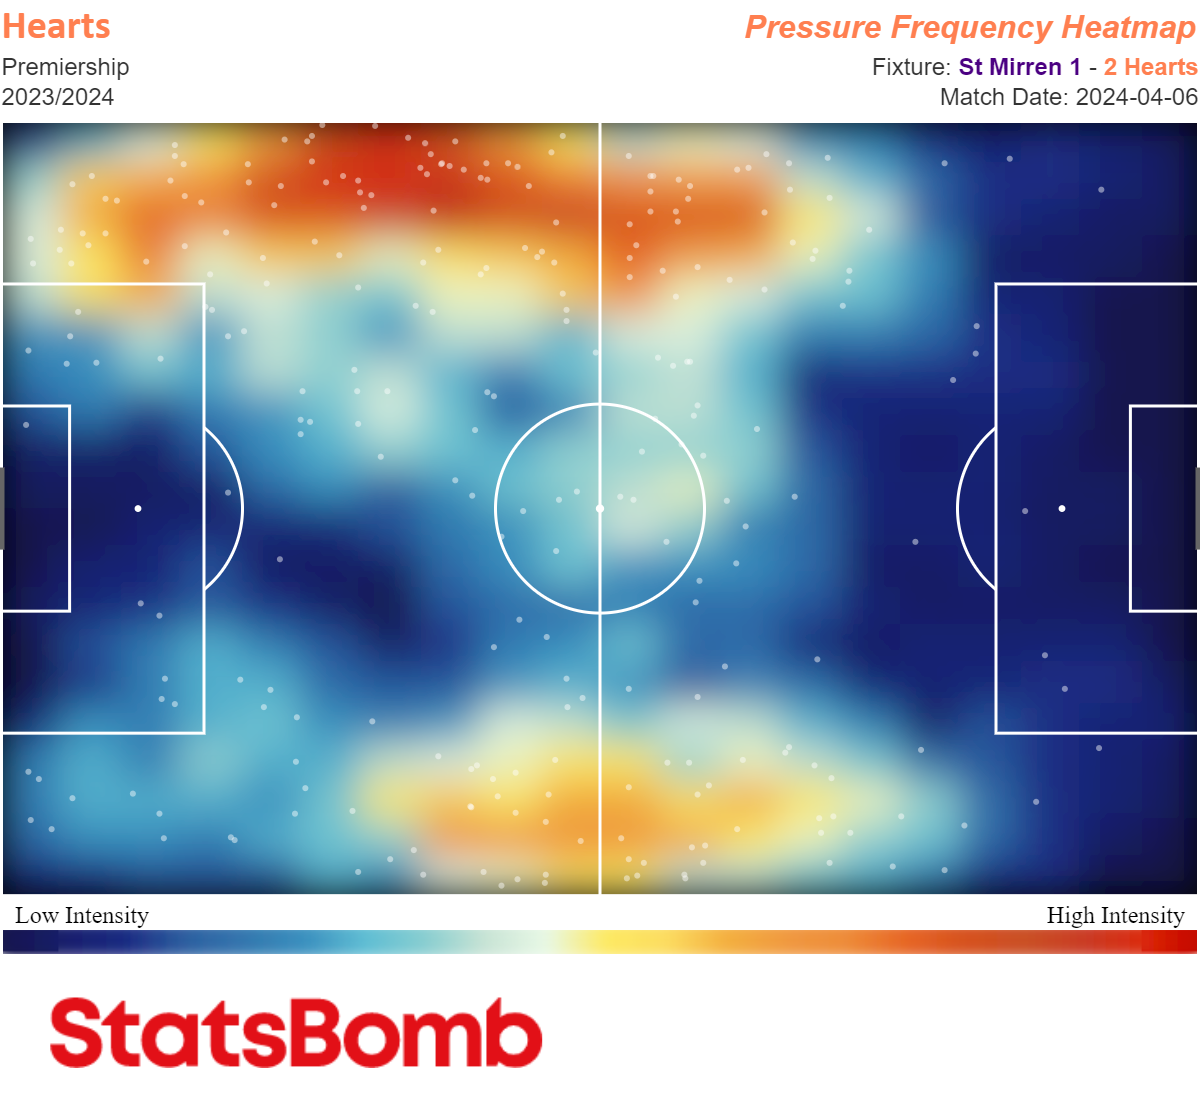
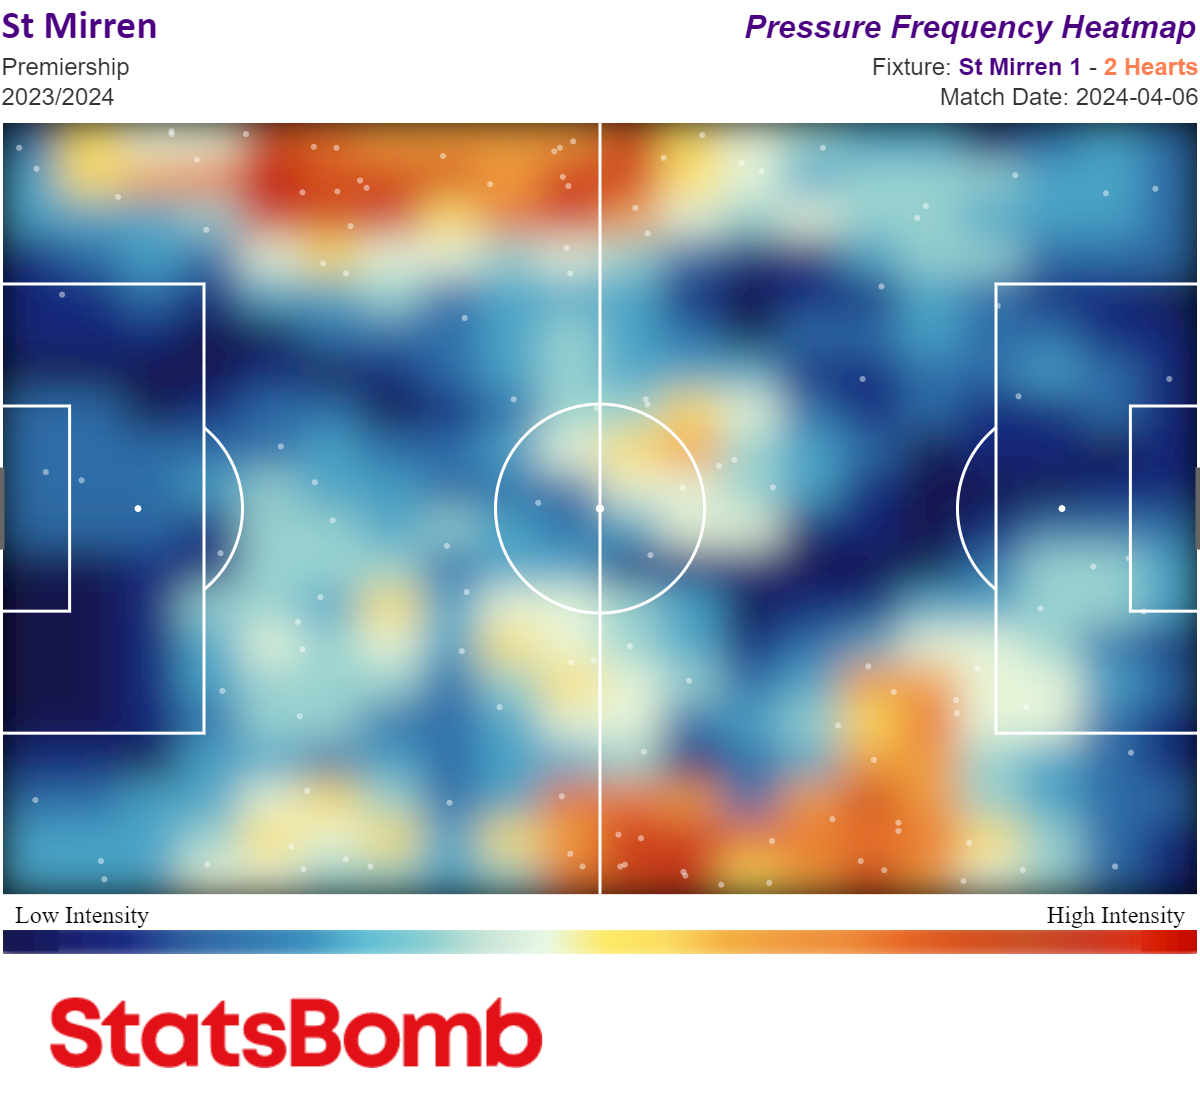
This kept the ball in tight areas surrounded by both sets of players, in a position where it was difficult for either side to do much damage. The game became scrappy and stop-start, a war of attrition where both teams were trying to wear each other down – and Hearts showed that they were more than up for the fight.


Read the rules here